


16.
Using CodeWarrior IDE with Version Control Systems
This chapter explains how to use the CodeWarrior IDE version control integration facilities to control your source code. Topics include:
Using Version Control Systems

A revision control or version control system (VCS) allows you to maintain a database of your source code, and then check files in or out of the database. This makes it easy to track changes to your code, particularly when more than one person is working on a software project.
Commercially Available VCS Plug-ins
The CodeWarrior IDE plug-in architecture supports a variety of verson control systems. Some of the major version control plug-ins available from Metrowerks and third parties include:
LEGEND: 4 IDE support
1 Platform support only
2 Under development
3 Requires VCS vendor's tools be pre-
installed
No IDE support
For the latest plug-in tool list, visit the Metrowerks website at:
http://www.metrowerks.com/desktop.qry?x=Version_Control
Activating VCS Operations
Before you can use any version control system with the CodeWarrior IDE, it must be properly installed and activated.
Installing VCS Software
Installing most revision control system software is as simple as copying the VCS plug-in to the appropriate folder for your platform and restarting the CodeWarrior IDE. This is usually all it takes to make the VCS software available for use.
 NOTE
NOTE
Be sure to follow the installation instructions that accompany the VCS software you plan to use. If you encounter any problems, contact the VCS software vendor for assistance.
VCS plug-ins normally reside in the Version Control folder. Use the following path descriptions to help you locate where your VCS plug-in should be copied to:
Activating VCS Software
The VCS Setup panel, as shown in Figure 16.1, is present if you have installed recognized revision control software. You use the VCS Setup panel to specify client options for connecting to a revision control systems.
Figure 16.1 The VCS settings panel
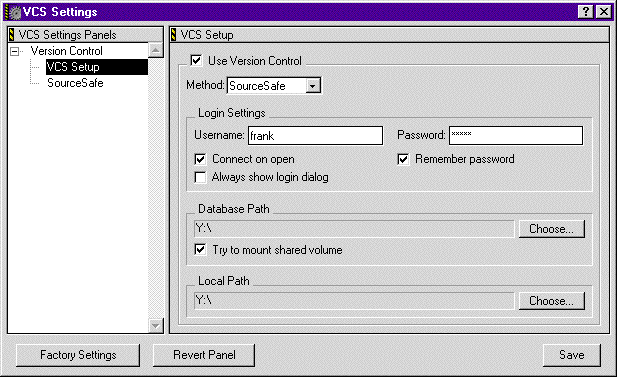
Setting up a CodeWarrior project for version control is simple. You just need to enter some information in the VCS Setup panel while a project is open. You'll need to input the information separately for each project that uses revision control.
NOTE
Be sure to follow the activation instructions that accompany the VCS software you plan to use. If you encounter any problems, contact the VCS software vendor for assistance.
To Activate Your VCS Settings:
1. Choose Version Control Settings from the Edit menu.
The VCS Settings window appears (Figure 16.1).
2. Enable the Use Version Control option.
Click the Use Version Control option to activate version control.
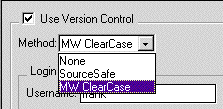
3. Choose a version control system from the Method menu.
The CodeWarrior IDE is capable of supporting several different types of version control. If your VCS software has been correctly installed, its name should be present on the Method list as shown in Figure 16.2.
Figure 16.2 Method pop-up list.
4. Enter your username.
Enter your user name in the Username field.
5. Enter your password (optional).
Enable the Remember Password option, then enter your password in the Password field.
6. Set additional Login Settings options.
To customize your development interaction with the chosen VCS setting you can enable any or all of the following options:
Click Choose to select the VCS database that you want to access. The actual setting of the Database Path field is dependent upon which VCS software you are using. See the VCS software documentation for more information.
8. Choose the Local Path.
Click Choose to select the destination folder where your local files will be stored. The actual setting of the Local Path field is dependent upon which VCS software you are using. See the VCS software documentation for more information.
9. Click Save.
Save your changes using the Save button.
If all your data was correct, you should be connected to the VCS database set in the Database Path field. If you aren't, review the above steps, ensuring that the data entered is correct.
NOTE
Some VCS software may have additional setup requirements. If you encounter any problems, contact the VCS software vendor for assistance.
Accessing VCS Features
The CodeWarrior IDE provides several ways to access common VCS operations and view status and log information. These include:
VCS Menu
Once version control is activated for a project, a VCS menu appears as shown in Figure 16.3. You select commands from the VCS menu to perform Get, Checkout, Checkin, and other common operations available from the specified version control system.
Macintosh
On the Macintosh, the VCS menu appears on the menubar as an icon that looks like this: .
.
NOTE
The VCS menu appearance may differ depending upon which VCS operations are available. See the documentation that came with the VCS software for more information.
Figure 16.3 VCS menus for Windows and Mac OS

Table 16.1 Supported VCS Operations
NOTE
Each VCS plug-in may assign different names to these operations. See the documentation that accompanied your VCS software to determine which operations are supported.
Figure 16.4 VCS Login dialog
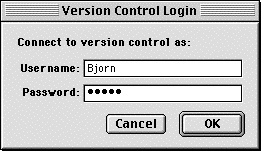
Version Control Login Window
The Version Control Login window (Figure 16.4) appears when you open a project that uses a revision control system and the Always Show Login Dialog option has been enabled. Enter your username and password, then click OK to continue opening the project. Otherwise, click Cancel to stop.
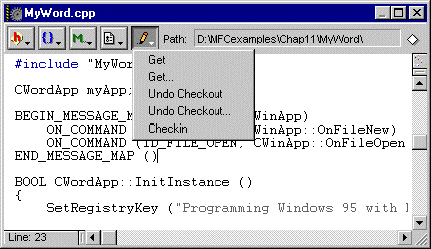
VCS Pop-up
The VCS Pop-up menu ( ) (Figure 16.5) appears in editor windows when a version control system is activated. The icon that represents the VCS Pop-up menu indicates the current permission setting for the file. For more information on permission settings, see "VCS States" on page 590.
Figure 16.5 VCS Pop-Up Menu
VCS States
When using a version control system, each file in a project can have a different permission setting. A file's permission setting can be viewed in the Project window's Checkout Status Column (Figure 16.6) and as part of the file's editor window's VCS Pop-up menu (Figure 16.6). See Table 16.2 for a description of each state indicator.
Table 16.2 VCS state Icons
Depending on the state of the VCS Pop-Up menu when you click on it, certain operations may be performed on the file you are editing. These supported operations are described in Table 16.3.
You choose an item from the VCS Pop-up menu to execute a VCS operation. If the menu item contains an ellipsis character "", a dialog box of advanced options for the operation appears, enabling you to customize the operation before executing it.
Mac OS
Press the Option key before choosing a menu command to access any advanced VCS options. If an ellipsis character "" appers next to a menu command, advanced VCS options are available for that operation.
For more information on these operations, refer to the documentation that came with your revision control system.
Table 16.3 Supported VCS Pop-up Operations
Project Window
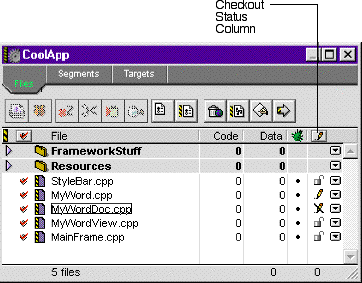
When version control is activated for a project, the Checkout Status column appears in the Project window (Figure 16.6). This column uses various icons to represent the current checkout status, or file permission, of the project files. Whenever you change the checkout status of a file in the CodeWarrior IDE, this column updates to reflect the change.
Figure 16.6 Checkout Status Column
VCS Messages Window
The CodeWarrior IDE uses a message window to display a log of revision control messages, as shown in Figure 16.7. To learn how to use the controls in the window, refer to "Using the Message Window" on page 376.
Figure 16.7 VCS Messages window

Common VCS Operations
In addition to the standard revision control operations like Add, Get, Checkout, Checkin, and others, various other operations are possible. These include:
Getting a File's Status
If you have configured your project file to use a version control system, and have checked in your files in accordance with the procedures described in the VCS documentation, you will see one of the icons of Table 16.2 in the Checkout Status column of the Project window for every file under revision control in your project. Refer to Figure 16.6 to see where the Checkout Status column is located in the Project window.
Clicking the Checkout Status column icon at the top of the column will perform a Synchronize Status command on the project's files against the revision control database. The status of all files you have on your hard disk will be compared and synchronized with the status of the files in the revision control database.
In addition, the VCS Pop-up menu in the file's editor window will always indicate the current checkout status of the file.
Modifying a Checked In File
You can change the status of a Checked in source code control file so you can modify it, but after modification, you will not be able to check it back into the source code control database. This feature is provided to allow you to experiment with a file by temporarily making it writable. If the revision control database allowed you to override permissions on files without consequence, it would not be providing any valuable control services for you.
Figure 16.8 Changing Read-Only to Modify Read-Only

Dealing with `ckid' Resources (Mac OS)
The CodeWarrior IDE almost always respects the presence of 'ckid' resources in text files. The 'ckid' resources was created for use by Projector and is used by most Macintosh VCS's.
The one time that the CodeWarrior IDE may do something different than indicated by a 'ckid' resource is when dealing with a project file that contains a 'ckid' resource.
Other Operations
Other operations may be available depending upon which revision control system plug-in you use. You will need to refer to the documentation that accompanied the VCS software you are using in order to determine this.
Visit the Metrowerks website at: http://www.metrowerks.com
For assistance contact Metrowerks Technical Support at: support@metrowerks.com
Copyright © 1999, Metrowerks Corp. All rights reserved.
Last updated: May 24, 1999


